
Thank you for purchasing CleanBrowsing web content filtering service. We know you’re anxious to get started, and this guide will work to make it as simple as possible.
Please note that if you are not accustomed to working with routers, modems, local configuration or DNS this can all feel like a daunting task, but we’ll be here to help you through the process. This is a one time setup that you won’t have to do again.
It’s also important to understand that this guide is specific to the Paid Plans, if you’re looking for instructions for the Free plans we encourage you to refer to the Getting Started instructions.
Things you Need Before Starting
Before you get started there a few things you want to think about:
1- Do you want this to protect the entire network?
2- Do you want to protect a local device?
3- Will you want it to protect devices while you move between locations?
Your answers to these questions will dictate how you deploy the service. For instance, if you want to cover a home network, you will want to configure the service in your router. Configuring it in the router will cover all devices connected to that router (e.g., mobile devices, SmartTV’s, etc..); essentially anything that makes a DNS query for a domain.
And you also need to have this information readily available:
1- Username and Password to the router
2- IP or URL to login in the router.
3- Admin access to your local machines and devices.
Configuring CleanBrowsing
Step 1: Navigating the CleanBrowsing Dashboard
When you first log into the CleanBrowsing dashboard you will be presented with a welcome screen that looks something like this:
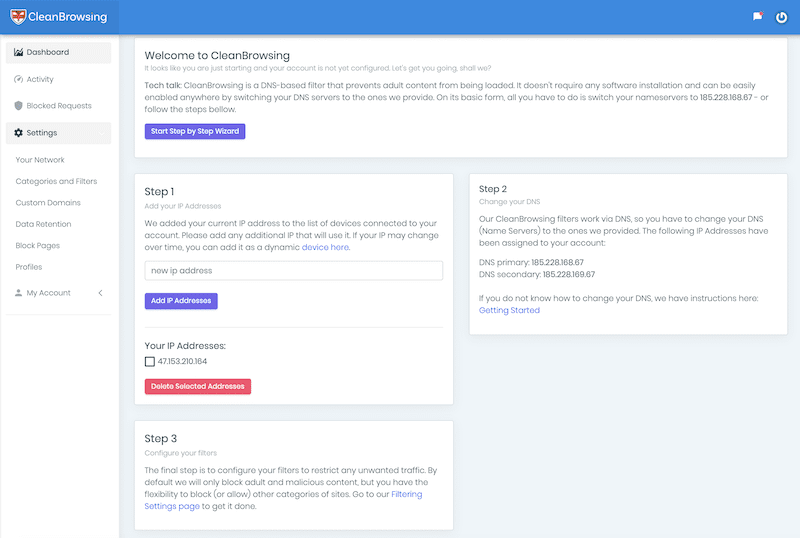
This page is designed to guide you through the process. It presents with you two very distinct options, a Guided On-boarding Tool or the manual steps required via Three steps.
If you are new to playing with your router, or local, configurations, we recommend trying the on-boarding tool.
Step 2: Configure Public IP
Unlike the Free plans, the paid plans have the ability to get granular with the type of filters and blocks you want to put on your network. For this reason we need to bind the DNS IP your account is assigned with your locations public IP. If you are concerned about IP’s that change often, we recommend reading our Generic Guide to Dynamic IP’s.
When you first get started, we do this for you on the default profile. You can see it in the dashboard above in the Step 1 card.
Step 3: Configuring the New CleanBrowsing DNS on your Device / Network
This is a straight forward process, but for the novice can feel very daunting as it’s work that falls in your local environment. Please take this into consideration when you’re getting ready to start.
Unfortunately, not all routers or devices are the same, but we try to be as helpful as we can. We encourage you to refer to our list of Guides as you get started, you’ll find instructions for a number of different routers and computers (e.g., Windows, Linux, Mac, etc…).
When working with your routers / devices you need to make note of the DNS IP’s that have been assigned to your account. You can find it on the getting started page vis the Step 2 card:
In this example, the DNS IPs that have been assigned to my account are:
DNS primary: 185.228.168.67
DNS secondary: 185.228.169.67
This means I need to add these DNS IPs to my router / device. A very common mistake we see is a user might pay for a plan, but leave our Free IPs configured. It is important that you replace any configurations that are using our Free Filters with these new IPs.
We have prepared a Commonly Asked Questions with Responses page that will help troubleshoot issues if necessary.
If possible, we recommend configuring one device locally and verifying it works. This helps remove variables that might be introduced with the router.
Step 4: Tuning the Network Traffic
Once the DNS is configured, you’re ready to start tuning your network.
The first place to start is on the Categories and Filters settings page. There are a total of 14 categories you can choose from.
Once you’ve defined your filters, you’ll want to play with the Custom Domains settings page. This page will allow you to get really granular with your network, it will allow you to define additional options on specific platforms (YouTube, Reddit, Fortnite, Instagram, etc..) and also allow you to explicitly define domains that might not be categorized. In short, this is a very powerful settings page that puts the entire network in your hands.
Enjoy a Clean Browsing Experience
That should be it, moving forward you’ll have explicit control of your network. If you ever have an issue, please feel free to contact us at support@cleanbrowsing.org.